Not sure how to use Adobe Premiere Pro? It can be daunting to get started. However, once you cross over the initial learning curve, Premiere Pro is actually a pretty easy-to-use and intuitive program with plenty of features that help video editors of all skill levels.
In our detailed guide to Adobe Premiere pro, you’ll discover hacks, video tutorials, and step-by-step instructions that’ll make your video editing life way easier — we promise.
How to use Adobe Premiere Pro
Before you purchase the Premiere Pro and install it on your computer, you do have some basic options to consider first. It also might help to do a little bit of research into the software, Adobe’s Creative Cloud, and what else you might need to invest in to be successful.
Get familiar with the software
Adobe Premiere Pro is a timeline-based video editing software which was first launched in 2003 as a successor to Adobe Premiere (first launched in 1991). It’s a NLE (non-linear editing system) that lets editors upload footage to a timeline —called a sequence — and work with a variety of motion, speed and audio effects.
Understand the Creative Cloud
Since 2013, Premiere Pro has been a part of Adobe’s Creative Cloud, which is basically just a set of apps and services which are available to users on a subscription basis (either for each individual app or for complete coverage).
These softwares and apps are downloaded from the “cloud” and installed directly on your local computers to be used as long as your subscription stays current.
What else do you need for success?
To really get the most out of your Adobe Premiere Pro experience, you might need to invest a bit into your computer. For both Mac and PC, Premiere Pro does require a good deal of processing power to run smoothly, especially when you start working with 4K footage or higher.
You can check out the full system requirements for Premiere Pro for both Windows and macOS computers on Adobe’s website here.
Frequently asked questions about Adobe Premiere Pro
Is Adobe Premiere Pro good for beginners?
Premiere Pro requires a little bit of a learning-curve to get started, but overall it is a great editing software for beginners and pros alike.
Is Adobe Premiere Pro free?
Premiere Pro is not free, it requires a subscription to use. Adobe currently requires an individual subscription free of $20.99 a month to use Premiere Pro, or $52.99 a month for access to the entire Creative Cloud.
Can I use Premiere Pro for YouTube?
Yes, Premiere Pro is a great software for editing YouTube videos. Premiere Pro has many features and settings specifically designed for the uploading, editing and exporting to YouTube.
How hard is it to learn Adobe Premiere Pro?
Premiere Pro is relatively easy to learn. It’s much more accessible than higher-end motion graphic apps like Adobe After Effects or Cinema 4D. However, it’s more complicated than template-based editors like Adobe Spark or Vimeo Create.
Adobe Premiere Pro tutorials and step-by-step instructions
All that sound good? Great! Now let’s dive into your basic steps for working in Premiere Pro.
How to import clips into Premiere Pro
The first step is simply importing and uploading your footage and clips into Premiere Pro. It’s really an easy click-through process. Follow these three steps:
- Click New Project
- Click on the Media Browser panel
- Click on the clips that you’d like to add
How to build a sequence in Premiere Pro
The next big step for getting started in Premiere Pro is to build a sequence. This sequence will be your timeline for creating your video as you can trim, cut, and move each clip around.
Here are the quick steps for creating a new sequence:
- Click on File
- Hover down to New
- Select Sequence
You can also use command+N to instantly bring up the new sequence window.
How to add adjustment layers in Premiere Pro
One of the cooler features in Premiere Pro is the all-powerful adjustment layer, which allows you to quickly add multiple effects to multiple clips on a timeline. To add an adjustment layer, follow these steps:
- Select File
- Hover down to New
- Click Adjustment Layer
You can then drag your new adjustment layer from the project panel to your timeline. Be sure to place it above all the clips that you want to be adjusted.
How to add text in Adobe Premiere Pro
Adding text is also quite simple, but if you’re used to an older version, things have changed a bit over the years. Here’s how to add text:
- Click on Window
- Hover down to Workspaces
- Click Titles
You’ll then be taken to the new Title Workspace where you can add and customize any text which you’d like to use in your video.
How to export your video in Premiere Pro
Finally, once you’ve edited your video and have it ready to go, exporting in Premiere Pro is quite easy as well. Here are the basic steps.
- Step 1: Click on File
- Step 2: Hover over Export
- Step 3: Click Media
You can also click Command + M to quickly bring up the Export Setting box. There will be lots of options and features to review, but for most videos you’ll want to choose the H.264 format. You can then set your filename and location before hitting Export.
How to copy effects in Premiere Pro
Copying effects in Premiere Pro is a great way to speed up your edit and make your videos more dynamic overall. Here are the quick steps to get started:
If you’re copying and pasting effects in Adobe Premiere, it’s probably because you want to give your clips a uniform feel. Maybe you want to sprinkle that crazy mosaic effect throughout your music video. Or maybe you’re color correcting multiple clips at once for that brand-commissioned business interview.
We’ll walk you through a few simple ways to copy effects in Adobe Premiere Pro. Ready to get started?
To copy effects:
- Step 1: Find your desired effect in the ‘Effects’ tab. Highlight it.
- Step 2: Next, drag and drop the effect over the clip on the timeline.
- Step 3: Once the effect is on your clip, adjust it by clicking on the Effect Control tab. Next, scroll down to the effect at the bottom. Adjust away!
- Step 4: Now that you’ve adjusted your effect, highlight the effect title and hit Command + C to copy.
- Step 5: Finally, highlight the clips on your timeline that you want to treat. Next, hit Command + V to paste. (Tip: You can highlight multiple clips at the same time using the shift key.)
To apply effects to source clips:
- Step 1: Rather than clicking on the clips in the timeline (as you did above), go in the Effect Controls tab of the clip you’re looking at, and find the Master tab.
- Step 2: Next, paste the effect in there, and every clip that this sources will have the effect. (Tip: This is super handy for color correcting interviews.)
To copy and paste multiple clip qualities (size, opacity, etc) in addition to multiple effects:
- Step 1: Go to the timeline and copy the clip with all of your desired changes.
- Step 2: Next, highlight the one you want to apply the effects to and hit Paste Attributes.
- Step 3: Now you can select which of the attributes and effects you’d like to copy from the last clip. And there you have it: Now you’ll never spend your time recreating the same effect on shots over and over again. Lucky you.
And viola! Now your effects are shared to the rest of your highlighted clips.
How to master audio in Adobe Premiere Pro
Working with audio in Premiere Pro is quite easy as well. You can quickly adjust audio levels by going to Clip > Audio Options > Audio Gain (or by pressing “G” on your keyboard). You can also unlock more audio control by adding keyframes to the audio clips on your sequence.
Let’s talk about the Parametric Equalizer (EQ)
Adobe’s Parametric Equalizer is an essential final step in amplifying your video’s sound design. Watch the tutorial above for some quick tips on adding that final polish to your audio, or read on for a simple breakdown of how to incorporate it into your next project.
- Step 1: Equalize your audio. So, you’ve cut out your stutters and removed the buzz from your speaker’s audio track. To add that final clarity and flow to your vocals, go to Effects > Audio Effects > Parametric Equalizer. From there, drag Parametric Equalizer onto your clip.
- If you want to further customize, click on your clip and go to Effect Controls > Custom Setup > Edit.
- Pro-tip: For more clarity, raise the higher notes in the track; if you’re craving a fuller, bassier sound, boost those the lower frequencies.
- Step 2: Use the Vocal Enhancer. Select Vocal Enhancer in your Parametric Equalizer’s dropdown menu. From there, tweak your frequencies up and down (it’s most effective if you keep it around 5 dB) until everything sounds right.
Countless variables will influence your overall audio recording — a buzzing lightbulb, a speaker’s distance from your microphone, the brand of microphone you’re using. In each of these scenarios, you’ll want slightly different settings to finesse your video’s audio.
Let’s talk about crossfades
A crossfade is the default audio transition for Adobe Premiere Pro. Use them to stitch together audio tracks, transition from opening or closing credits, or layer sounds in and out as needed. We use crossfades in almost every video we edit. (Yep, they’re that useful.)
How to apply your crossfade
To apply the Constant Power Crossfade (⌘ Shift+D), use the following steps:
- Step 1: Go to Effects panel > Audio Transitions > Crossfade
- Step 2: Next, drag the Constant Power option onto your clip.
Fine-tuning your audio
By default, the fade duration will be one second. This is great for lowering or transitioning music. However, if you’re editing dialogue, you’ll want to bump your transition time down, changing your crossfade from seconds to frames.
For dialogue, five frames is sufficient for cutting 10 minutes of footage into a one-minute interview, or for editing out moments when a speaker stumbles over a word. Using five frames is also helpful for smoothly transitioning from a speaking clip into another scene.
How to adjust your fade time
To tweak your fade time, use the following steps:
- Step 1: Navigate to Preferences > Timeline > Audio Transition Default Duration
- Step 2: Change seconds to frames.
- Step 3: Lastly, change the time from one second to five seconds.
Mastering color grading in Premiere Pro
While not initially known for its color controls, Premiere Pro has made great strides in recent versions to become one of the better color apps on the market. Use for basic color correction as well as more advanced coloring and looks.
To work with color in Premiere Pro, all you have to do is open the Color Workspace by selecting Window > Workspace > Color. From there you can access the Essential Graphics panel as well as work with Lumetri Color for correction and grading.
- Step 1: Choose the Color tab from the workspaces at the top of Premiere to open Lumetri. Your scopes appear on the left side while your Effect Adjustments appear on the right.
- Step 2: Make adjustments in the Basic Correction tab.
- Step 3: Add filters and make further adjustments in the Creative tab.
- Step 4: Adjust your RGB and Hue/Saturation curves in the Curves tab.
- Step 5: Tweak your shadows, mid-tones, and highlights in the Color Wheels tab. Pro-tip: Use the Color Match feature to match two shots easily.
- Step 6: If you want to make precise adjustments to specific colors, you can do so in the HSL Secondary tab.
- Step 7: And, finally, if you want to add a customized vignette, you can do so in the Vignette tab.
How to make sequence presets in Adobe Premiere Pro
Once you are more comfortable navigating your way around Premiere Pro, there really are plenty of higher-end functions that make the app so appealing to novices and pros alike. One of those features is the sequence preset option which can help you work more quickly by saving your favorite settings.
Simply put, a sequence preset is a pre-made setting for your video sequence. It’s a template, essentially.
Let’s jump in.
Sequence presets save you time
When you make a new sequence, you need to specify specific settings (like your resolution and timebase). Presets are meant to help save you the time and the headache of scrolling through all the options in the sequence window and corroborating those settings with your camera’s.
For instance, if you know you shot on an Arri camera, you can find a pre-made sequence made just for that type of footage. Same thing for DSLRs, and dozens of other commonly used cameras and codecs.
Sometimes you want to make your timeline based on your camera settings. Other times, you want to base it off of your export settings. It all depends on your project.
Adobe Premiere comes with dozens of sequence presets for you to choose from already, but if you have a video series that has custom needs, you can make your own preset to save you time.
How to make your own sequence preset
- Step 1: Start your project. To create a new sequence click the new item icon in the bottom right corner of the media bin. From there, choose Sequence.
- Step 2: Select your starting preset. When the new Sequence window pops up, you will be greeted by the plethora of presets. These are based on the settings of various cameras and editing codecs.
- Step 3: Choose your camera and frame rate. Go to Settings and find the Editing mode dropdown. Choose the camera settings that match your footage. From there, select your Timebase (AKA frame rate) of your video.
- Step 4: Set your resolution. Go to the Frame Size windows and type your resolution in. The rest of the setting options in this tab are important, but usually can be left as is unless you are doing something specific. Always reference your source media and final export plans when in doubt.
- Step 5: Choose your tracks, set your spec. In the Tracks tab, set how many video and audio tracks you want your sequence to include, and specify the type of audio track. While you can easily customize these elements in any project, if you’re making a preset, then most likely you are planning on cutting similar videos in the future.
- Step 6: Hit Save Preset, and give it a name. After doing so it will take you back to the Sequence Presets tab where your newly named Preset will be in the Custom folder. From there this technique will really help you knock out videos on tighter schedules, and with some of your go-to camera settings and looks just a click away.
Pro tip: One common place people can get tripped up is the Pixel Aspect Ratio. 99% of the time, you’ll be using square pixels. Unless you shoot your footage with a specific camera or in a specific way (i.e. Anamorphic) you will be using square pixels. If you can’t figure out why your video looks stretched or squished, it’s usually your pixels.
How to import and export presets
With just over 100 different controls, knowing how and when to export your presets will make your video editing that much faster. And, if you export the same way every time, there’s no need to even think about them. Messing with export settings is cancelled.
Here’s how it works.
Exporting your preset
- Step 1: Go to File > Export > Media or hit Command-M on your keyboard to open the Export Settings window.
- Step 2: Customize your export settings to the specifications required for your project. Relish in the fact that this is the last time you’ll ever have to input these specific settings.
- Step 3: Click on the Save Preset icon which lives directly next to the Preset dropdown at the top of the Export Settings. In that window that pops up, you can choose to include the Effects and Publish settings if you toggled any of the settings within those tabs earlier.
- Step 4: Export. You can find your shiny new preset by navigating to Documents > Adobe > Adobe Media Encoder > ## > Presets if you want to share your preset with another editor.
Importing your preset
- Step 1: Go to File > Export > Media or hit Command-M on your keyboard to open the Export Settings window.
- Step 2: Click on the Import Preset icon which you can find next to the “Preset” dropdown at the top of the Export Settings.
- Step 3: Find your preset and click Open.
A few things to consider about presets
The most important factor in selecting the proper preset is knowing both your footage and your final export specs. Have these on-hand before you start working to keep your workflow moving.
If any of the already-available presets apply to your projects, you can use them. The most important things to set correctly are the frame rate and the resolution. The rest can be easily adjusted later in the process, though probably still best to get it right the first time.
If you don’t see one that applies, or you’d just prefer to input the settings yourself, go to Settings. You can choose an existing preset, and then click on the Settings tab to modify that preset.
If you’re customizing your preset, you need to consider how your footage specs differ from your timeline specs. These elements will affect your overall edit. Let’s say you shoot a video at 30 frames per second (fps), but export it in 24fps. Having a 30fps video in a 24fps timeline may also affect playback speed and render times. If your footage has a lower resolution than your raw footage, do you want to be spending most of your time rescaling it into your frame? These are all things to consider ahead of time.
As a general rule: If you are using mixed source media with varying resolutions and frame rates, set your timeline to your intended final export settings. Otherwise, if it’s all from the same source, keep the timeline consistent with your source media’s specs.
Basic Adobe Premiere keyboard shortcuts you should know
Finally, if you truly want to turn into a Premiere Pro wizard, you really need to master the keyboard shortcuts. By using these shortcuts (a.k.a. hotkeys), a good editor can work at blazing speeds quickly jumping between different controls and commands with the click of a keyboard.
First things first: If there’s a task you do manually more than three times a day, using the hotkey will save you time.
We’ll be referring to the Adobe keyboard map in the shortcuts below. Also worth noting: Once you’ve opened Premiere Pro, all you have to do is tap the key. There’s no ⌘/ctrl needed, unless stated otherwise.
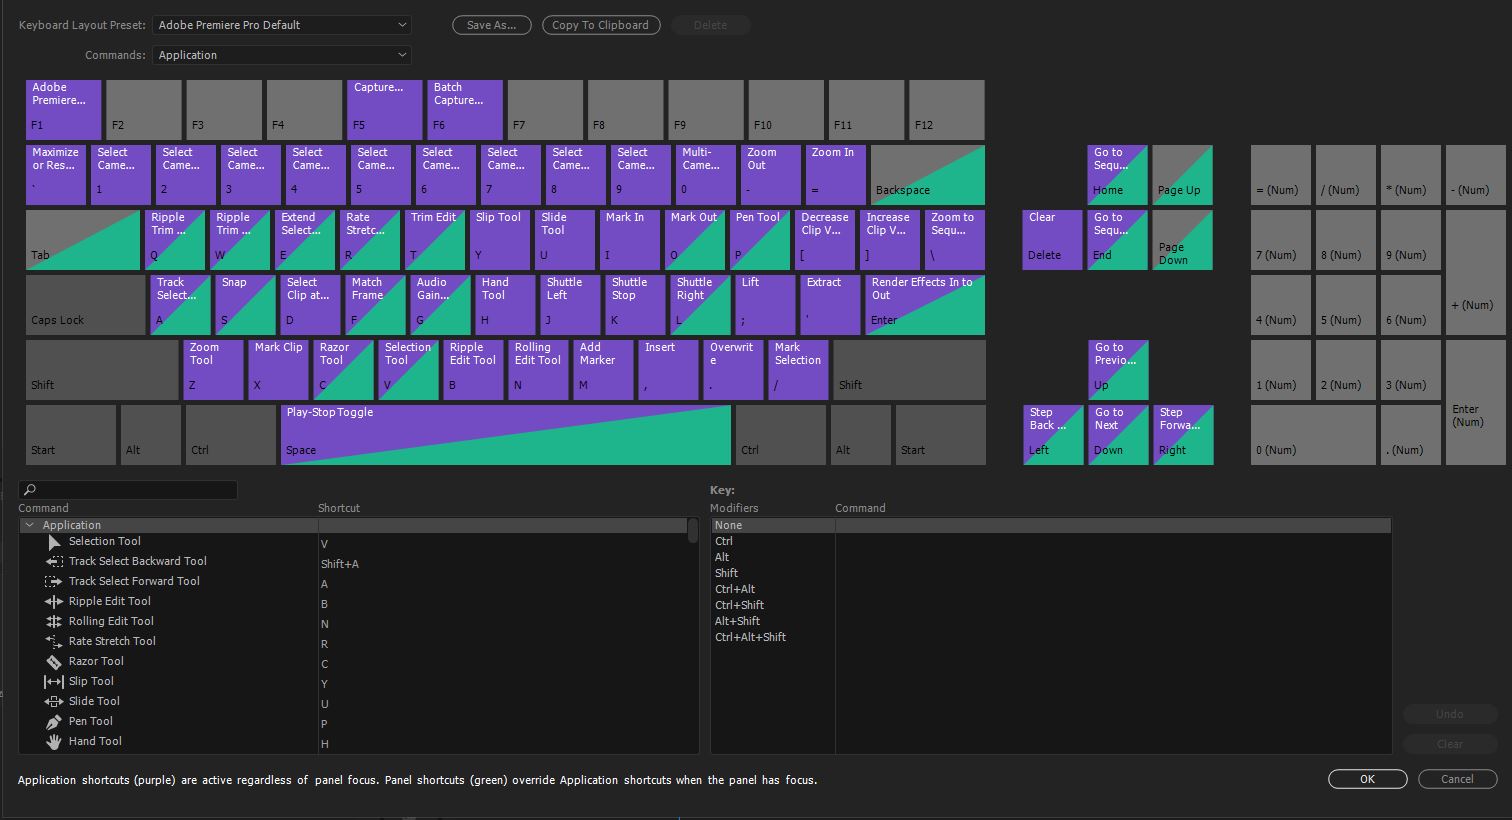
Our 7 favorite Premiere Pro shortcuts
1. Rewind, pause, advance (J, K, L)
Rewind, pause, advance (J, K, L) make up your shuttle keys. Use J to reverse playback, K to pause, and L to play or fast-forward. (Pro tip: Tap J or L multiple times to adjust your speed.)
2. Match frame (F)
Match frame (F) takes you to the exact frame of the source clip your playhead is over. This is extremely handy if you want to quickly review the rest of a shot. Or if you deleted your audio for that shot and want to get it back within the same in and out points.
3. The track select forward tool (A)
The track select forward tool (A) selects every available clip on all tracks to the right of your arrow. When you’re working on long and complex timelines, this shortcut is vital for not having to zoom out and select the clips on either side of your edit. With the tap of the A key, you can make room for a new clip, or adjust the length of an existing one.
4. The slip tool (Y)
The slip tool (Y) hotkey is used for shifting footage within an in and out point. This shortcut is super helpful if you’re making adjustments to montages, music videos, and other quick-cut sequences where the imagery doesn’t need to match the action. If you want to leave an existing clip unmodified, press Y. Then, drag your new footage over and shift its start and end frame.
5. Snapping (S)
Snapping (S) is when you automatically snap clips together with no black space. You can find snapping in the magnet icon above your timeline. Pressing the S key turns it on or off. This is an especially good hotkey to know, since most people accidentally hit the snapping magnet while editing, but don’t know how to turn it back on.
6. Reverting your cursor (V)
Reverting your cursor (V) turns your cursor back to the standard arrow (a.k.a your selection tool). This is your “home base” in terms of cursors, making it a breeze to switch between tasks.
7. Saving your work (⌘S)
Saving your work (⌘S) should need no explanation, but it’s so essential that it bears repeating. The more you get into the rhythm of hitting ⌘S (Ctrl+S on a PC) after every adjustment, the less likely you are to lose hours of hard work. Save, save, save.
Now you’re ready to go (Adobe Premiere) pro
There’s a reason why Premiere Pro is one of the best software for video editing on the market. Beginners might find it intimidating, but the learning curve isn’t anything you can’t tackle with the right resources.
Keep learning with Vimeo Video School.
*Original articles written by Anthony Arfi, Ian Blau, Andrea Allen, Niko Brown, and Mark Cersosimo. Updated in 2021 by Jourdan Aldredge.
